ปลั๊กอิน Outlook
Outlook allows for third-party applications to connect in order to execute database actions from emails. NightPOS has a plugin for Outlook that allows for the creation of an opportunity from the email panel.
Note
ปลั๊กอิน Outlook พร้อมใช้งานสำหรับทั้ง Outlook เวอร์ชันเดสก์ท็อปและเว็บ ดู บทความเกี่ยวกับส่วนเสริมของ Microsoft
การกำหนดค่า
The Outlook Mail Plugin needs to be configured both on NightPOS and Outlook.
Important
ตรวจสอบเวอร์ชันฐานข้อมูลใน แอปการตั้งค่า --> การตั้งค่าทั่วไป ที่ด้านล่างของหน้า
For database versions 19.2 and later, see the latest documentation for installation instructions.
เปิดใช้งานปลั๊กอินเมล
ขั้นแรก เปิดใช้งานโมดูล Mail Plugin ในฐานข้อมูล ไปที่ เปิดใช้งาน Mail Plugin และ บันทึก การกำหนดค่า
ติดตั้งปลั๊กอิน Outlook
Download () the following XML file to upload later: https://download.nightposcdn.com/plugins/outlook/manifest.xml.
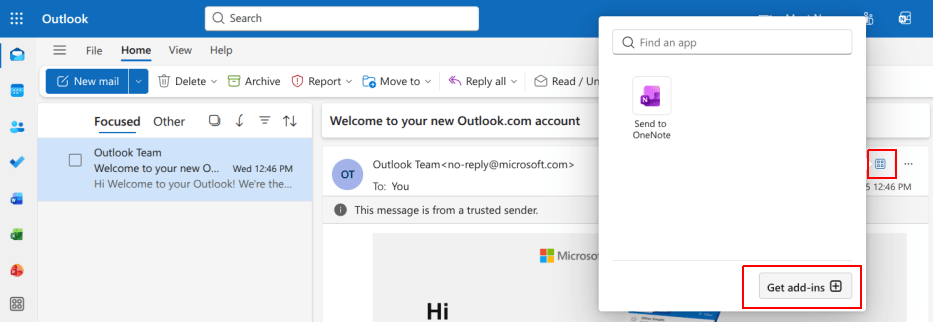
ถัดไป เปิดกล่องจดหมาย Outlook แล้วเลือกอีเมลใดก็ได้ หลังจากทำเสร็จแล้ว คลิกปุ่ม Apps ที่มุมบนขวา จากนั้นคลิก Get add-ins
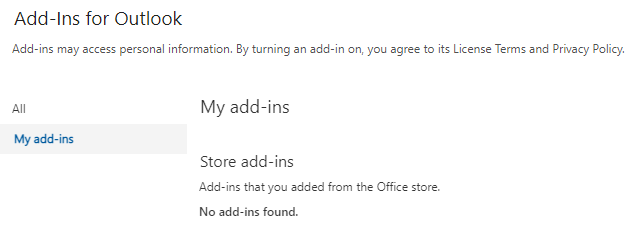
หลังจากทำตามขั้นตอนนี้แล้ว เลือกแท็บ Add-ins ของฉัน ที่ด้านซ้าย
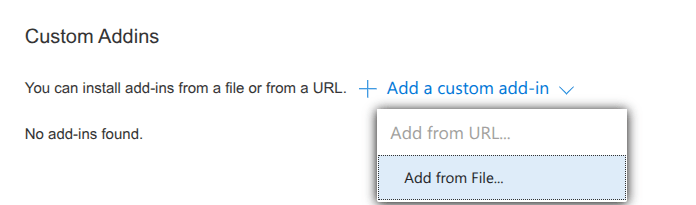
ภายใต้ Custom Addins ทางด้านล่าง คลิก + Add a custom add-in จากนั้นเลือก Add from file...
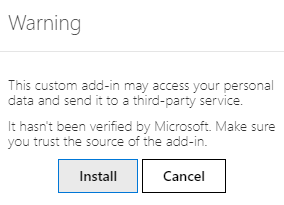
ขั้นตอนต่อไป ให้แนบไฟล์ manifest.xml ที่ดาวน์โหลดมาข้างต้น และกด ตกลง จากนั้น อ่านคำเตือนและคลิกที่ ติดตั้ง
เชื่อมต่อฐานข้อมูล
Now, Outlook will be connected to the NightPOS database. First, open any email in the Outlook mailbox, click on the Apps button in the upper right-side, and select NightPOS Inbox Addin.

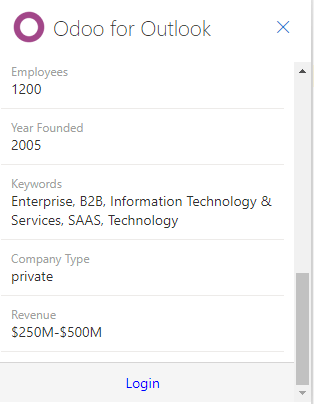
แผงด้านขวาสามารถแสดง ข้อมูลเชิงลึกของบริษัท ได้แล้ว ที่ด้านล่าง ให้คลิกที่ เข้าสู่ระบบ
Note
คำขอ ข้อมูลเชิงลึกของบริษัท (Lead Enrichment) จำนวนจำกัดเท่านั้นที่พร้อมใช้งานเป็นฐานข้อมูลทดลองใช้ ฟีเจอร์นี้ต้องใช้ เครดิตเติมเงิน
Tip
หากหลังจากผ่านไปสักครู่แผงยังว่างเปล่าอยู่ เป็นไปได้ว่าการตั้งค่าคุกกี้ของเบราว์เซอร์อาจป้องกันไม่ให้โหลดได้ โปรดทราบว่าการตั้งค่าเหล่านี้จะเปลี่ยนแปลงด้วยหากเบราว์เซอร์อยู่ในโหมด Incognito
To fix this issue, configure the browser to always allow cookies on NightPOS's plugin page.
For Google Chrome, change the browser cookie settings by following the guide at:
https://support.google.com/chrome/answer/95647 and adding download.nightpos.com to the list of
Sites that can always use cookies.
เมื่อดำเนินการเสร็จสิ้นแล้ว จะต้องเปิดแผง Outlook อีกครั้ง
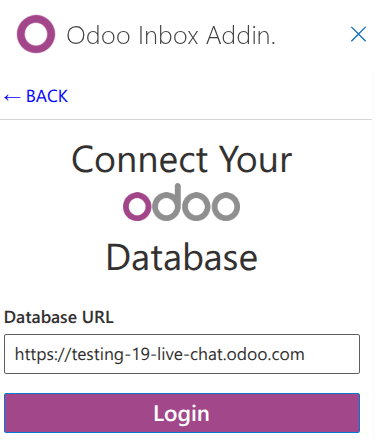
Now, enter the NightPOS database URL and click on Login.
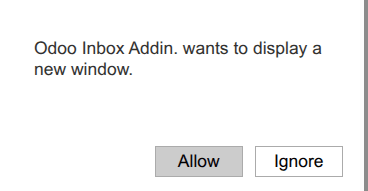
ขั้นตอนถัดไป คลิกที่ อนุญาต เพื่อเปิดหน้าต่างป๊อปอัป
หากผู้ใช้ไม่ได้เข้าสู่ระบบฐานข้อมูล ให้ป้อนข้อมูลประจำตัว คลิกที่ อนุญาต เพื่อให้ปลั๊กอิน Outlook เชื่อมต่อกับฐานข้อมูล

ใช้ปลั๊กอินกล่องจดหมาย
To use the plugin, open any email in the Outlook mailbox, click on the Apps button in the upper right-side, and select NightPOS Inbox Addin to open the panel.
Note
ตัวเลือกที่มีในแผงจะแตกต่างกันไปตามแอปพลิเคชันที่ติดตั้งในฐานข้อมูล
สร้างผู้ติดต่อ
To create a contact record in NightPOS from an email, click the (circle plus) icon.
Note
**ต้อง**สร้างระเบียนผู้ติดต่อก่อนจึงจะสร้างลีด/โอกาสได้
สร้างโอกาส
To create an opportunity from an email, click the (plus) icon next to Opportunities. Doing so opens a new opportunity record in NightPOS in a new tab. The subject of the email is used as the opportunity title, and the content of the email is added to the Notes tab of the opportunity.
สร้างงาน
To create a task from an email, click the (plus) icon next to Tasks. Then, enter the title of the project where the task should be created in the resulting field, and select the appropriate project from the resulting list. This opens a new task record in NightPOS in a new tab. The subject of the email is used as the task title, and the content of the email is added to the Description tab.
สร้างตั๋ว
To create a task from an email, click the (plus) icon next to Tickets. Doing so opens a new ticket record in NightPOS in a new tab. The subject of the email is used as the ticket title, and the content of the email is added to the Description tab of the ticket.