ส่งออกและนำเข้าข้อมูล
In NightPOS, it is sometimes necessary to export or import data for running reports, or for data modification. This document covers the export and import of data into and out of NightPOS.
Important
บางครั้งผู้ใช้อาจพบข้อผิดพลาด 'time out' หรือระเบียนไม่ได้รับการประมวลผลเนื่องจากขนาดของระเบียน สิ่งนี้อาจเกิดขึ้นได้กับการส่งออกขนาดใหญ่หรือในกรณีที่ไฟล์นำเข้ามีขนาดใหญ่เกินไป เพื่อหลีกเลี่ยงข้อจำกัดเกี่ยวกับขนาดของระเบียน ให้ประมวลผลการส่งออกหรือนำเข้าเป็นชุดย่อยที่เล็กลง
Export data from NightPOS
When working with a database, it is sometimes necessary to export data in a distinct file. Doing so can aid in reporting on activities, although, NightPOS provides a precise reporting tool with each available application.
With NightPOS, the values can be exported from any field in any record. To do so, activate the list view (List) icon, on the items that need to be exported, and then select the records that should be exported. To select a record, tick the checkbox next to the corresponding record. Finally, click the Action button, and select Export.
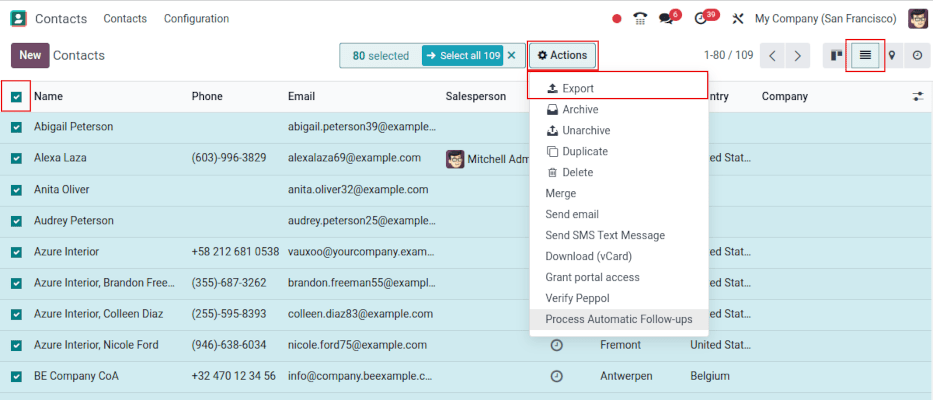
เมื่อคลิกที่ ส่งออก หน้าต่างป๊อปอัป ส่งออกข้อมูล จะปรากฏขึ้นพร้อมตัวเลือกหลายอย่างสำหรับข้อมูลที่จะส่งออก:

เมื่อทำเครื่องหมายที่ตัวเลือก ฉันต้องการอัปเดตข้อมูล (การส่งออกที่เข้ากันได้กับการนำเข้า) ระบบจะแสดงเฉพาะฟิลด์ที่สามารถนำเข้าได้ ซึ่งมีประโยชน์ในกรณีที่:ref:
ต้องอัปเดตเรกคอร์ดที่มีอยู่ <essentials/update-data>ซึ่งทำงานเหมือนตัวกรอง การไม่ทำเครื่องหมายในช่องจะให้ตัวเลือกฟิลด์มากขึ้น เนื่องจากจะแสดงฟิลด์ทั้งหมด ไม่ใช่เฉพาะฟิลด์ที่สามารถนำเข้าได้เท่านั้นเมื่อส่งออก มีตัวเลือกในการส่งออกสองรูปแบบ:
.csvและ.xlsด้วย.csvรายการจะถูกคั่นด้วยเครื่องหมายจุลภาค ในขณะที่.xlsเก็บข้อมูลเกี่ยวกับเวิร์กชีตทั้งหมดในไฟล์ รวมถึงเนื้อหาและการจัดรูปแบบนี่คือรายการที่สามารถส่งออกได้ ใช้ไอคอน (แสดงฟิลด์ย่อย) เพื่อแสดงตัวเลือกฟิลด์ย่อยเพิ่มเติม ใช้แถบ ค้นหา เพื่อค้นหาฟิลด์เฉพาะ ในการใช้ตัวเลือก ค้นหา ได้อย่างมีประสิทธิภาพมากขึ้น ให้คลิกที่ไอคอน (แสดงฟิลด์ย่อย) ทั้งหมดเพื่อแสดงฟิลด์ทั้งหมด
ปุ่มไอคอน (เลือกฟิลด์) ใช้เพื่อเพิ่มฟิลด์ในรายการ ฟิลด์ที่จะส่งออก
ไอคอน (เรียงลำดับ) ทางด้านซ้ายของฟิลด์ที่เลือกสามารถใช้เพื่อย้ายฟิลด์ขึ้นและลง เพื่อเปลี่ยนลำดับที่แสดงในไฟล์ที่ส่งออก ลากและวางโดยใช้ไอคอน (เรียงลำดับ)
ไอคอน (ลบฟิลด์) ใช้เพื่อลบฟิลด์ คลิกไอคอน (ลบฟิลด์) เพื่อลบฟิลด์
สำหรับรายงานที่เกิดซ้ำ การบันทึกค่าที่ตั้งไว้ล่วงหน้าสำหรับการส่งออกจะมีประโยชน์ เลือกฟิลด์ที่จำเป็นทั้งหมด และคลิกที่เมนูแบบเลื่อนลงของเทมเพลต เมื่ออยู่ที่นั่น ให้คลิกที่ เทมเพลตใหม่ และตั้งชื่อที่ไม่ซ้ำให้กับเทมเพลตการส่งออก คลิกไอคอน (ฟล็อปปี้ไดรฟ์) เพื่อบันทึกการกำหนดค่า ครั้งต่อไปที่ต้องส่งออกรายการเดียวกัน ให้เลือกเทมเพลตที่เกี่ยวข้องที่บันทึกไว้ก่อนหน้านี้จากเมนูแบบเลื่อนลง
Tip
การทราบตัวระบุภายนอกของฟิลด์จะเป็นประโยชน์ ตัวอย่างเช่น บริษัทที่เกี่ยวข้อง ในส่วนติดต่อผู้ใช้การส่งออกจะเท่ากับ parent_id (ตัวระบุภายนอก) สิ่งนี้มีประโยชน์เพราะข้อมูลที่ส่งออกจะเป็นเพียงข้อมูลที่ควรแก้ไขและนำเข้าใหม่
Import data into NightPOS
Importing data into NightPOS is extremely helpful during implementation, or in times where data needs to be updated in bulk. The following documentation covers how to import data into an NightPOS database.
Warning
การนำเข้ามีผลถาวรและ**ไม่สามารถ**ยกเลิกได้ อย่างไรก็ตาม สามารถใช้ตัวกรอง (สร้างเมื่อ หรือ แก้ไขล่าสุด) เพื่อระบุระเบียนที่เปลี่ยนแปลงหรือสร้างโดยการนำเข้า
Tip
การเปิดใช้งาน:ref:โหมดนักพัฒนา <developer-mode>`จะเปลี่ยนการตั้งค่าการนำเข้าที่มองเห็นในเมนูด้านซ้าย การดำเนินการดังกล่าวจะแสดงเมนู:menuselection:`ขั้นสูง ภายในเมนูขั้นสูงนี้มีตัวเลือกสองอย่าง: ติดตามประวัติระหว่างการนำเข้า และ อนุญาตให้จับคู่กับฟิลด์ย่อย

หากโมเดลใช้ openchatter ตัวเลือก ติดตามประวัติระหว่างการนำเข้า จะตั้งค่าการสมัครสมาชิกและส่งการแจ้งเตือนระหว่างการนำเข้า แต่จะทำให้การนำเข้านั้นช้าลง
Should the Allow matching with subfields option be selected, then all subfields within a field are used to match under the NightPOS Field while importing.
เริ่มเลย
Data can be imported on any NightPOS business object using either Excel (.xlsx) or CSV (.csv) formats. This includes: contacts, products, bank statements,
journal entries, and orders.
เปิดมุมมองของอ็อบเจ็กต์ที่ควรนำเข้า/กรอกข้อมูล คลิกที่ไอคอน (การกระทำ) และในเมนูแบบเลื่อนลงเลือก (นำเข้าเรกคอร์ด)
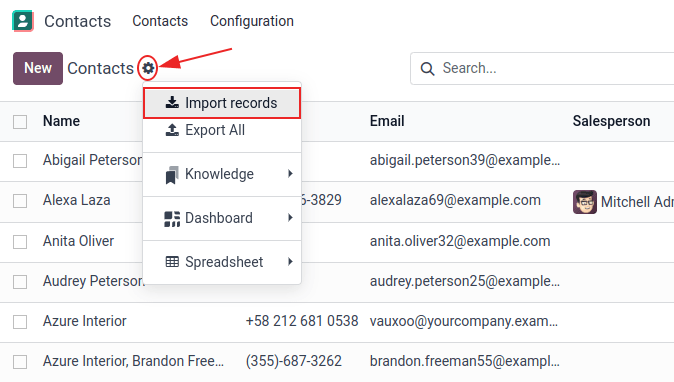
คลิก นำเข้าเทมเพลตสำหรับลูกค้า ที่กึ่งกลางหน้าเพื่อดาวน์โหลด:ref:`เทมเพลต <essentials/export_import_data/adapt-a-template>`และกรอกข้อมูลของบริษัทเอง เทมเพลตดังกล่าวสามารถนำเข้าได้ในคลิกเดียวเนื่องจากการแมปข้อมูลได้รับการกำหนดค่าไว้ล่วงหน้าแล้ว
ในการอัปโหลดเทมเพลตที่ดาวน์โหลดหรือไฟล์ที่มีอยู่ ให้ทำตามขั้นตอนถัดไป:
คลิก:guilabel:`อัปโหลดไฟล์ข้อมูล`และเลือกไฟล์ที่ต้องการ
ปรับตัวเลือก:guilabel:`การจัดรูปแบบ`ตามต้องการ (สำหรับไฟล์ CSV เท่านั้น)
Ensure all data in the File Column is correctly mapped to the appropriate NightPOS Field and free of errors.
(ตัวเลือก) คลิก:guilabel:`โหลดไฟล์ข้อมูล`เพื่อโหลดไฟล์เดียวกันใหม่หรืออัปโหลดไฟล์อื่น
คลิก:guilabel:`ทดสอบ`เพื่อตรวจสอบว่าข้อมูลถูกต้อง
คลิก:guilabel:
นำเข้า
Note
ตัวเลือก:guilabel:การจัดรูปแบบ`**ไม่**ปรากฏเมื่อนำเข้าไฟล์ Excel ประเภทกรรมสิทธิ์ (เช่น `.xls หรือ .xlsx)
ปรับแต่งเทมเพลต
เทมเพลตนำเข้ามีให้ใช้ในเครื่องมือนำเข้าสำหรับข้อมูลทั่วไปที่ต้องนำเข้า (รายชื่อผู้ติดต่อ ผลิตภัณฑ์ รายการธนาคาร ฯลฯ) เปิดเทมเพลตด้วยซอฟต์แวร์สปรีดชีตใดๆ (Microsoft Office, OpenOffice, Google Drive ฯลฯ)
เมื่อดาวน์โหลดเทมเพลตแล้ว ให้ดำเนินการตามขั้นตอนเหล่านี้:
เพิ่ม ลบ และจัดเรียงคอลัมน์ให้เหมาะสมกับโครงสร้างข้อมูลมากที่สุด
ขอแนะนำอย่างยิ่งว่า**ไม่ควร**ลบคอลัมน์ External ID (ID) (ดูเหตุผลในส่วนถัดไป)
กำหนด ID ที่ไม่ซ้ำกันให้กับทุกระเบียนโดยลากลำดับ ID ลงในคอลัมน์ External ID (ID)
Note
When a new column is added, NightPOS may not be able to map it automatically, if its label does not fit any field within NightPOS. However, new columns can be mapped manually when the import is tested. Search the drop-down menu for the corresponding field.
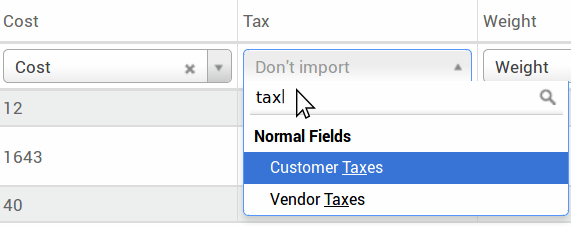
จากนั้น ใช้ชื่อของฟิลด์นี้ในไฟล์นำเข้าเพื่อให้แน่ใจว่าการนำเข้าในอนาคตจะสำเร็จ
Tip
อีกวิธีหนึ่งที่มีประโยชน์ในการค้นหาชื่อคอลัมน์ที่เหมาะสมในการนำเข้าคือการส่งออกไฟล์ตัวอย่างโดยใช้ฟิลด์ที่จะนำเข้า ด้วยวิธีนี้ หากไม่มีเทมเพลตตัวอย่างการนำเข้า ชื่อจะถูกต้องแม่นยำ
นำเข้าจากแอปพลิเคชันอื่น
The External ID (ID) is a unique identifier for a line item. It is possible to use an External ID (ID) from previous software to facilitate the transition to NightPOS.
การกำหนด ID ไม่จำเป็นเมื่อทำการนำเข้า แต่จะช่วยได้ในหลายกรณี:
อัปเดตการนำเข้า: นำเข้าไฟล์เดียวกันหลายครั้งโดยไม่สร้างรายการซ้ำ
To recreate relationships between different records, the unique identifier from the original application should be used to map it to the External ID (ID) column in NightPOS.
เมื่อนำเข้าระเบียนอื่นที่เชื่อมโยงกับระเบียนแรก ให้ใช้ XXX/ID (XXX/External ID) สำหรับตัวระบุที่ไม่ซ้ำกันเดิม ระเบียนนี้สามารถค้นหาได้โดยใช้ชื่อด้วย
Warning
ควรทราบว่าจะเกิดข้อขัดแย้งหากมีสอง (หรือมากกว่า) ระเบียนที่มี External ID เดียวกัน
ไม่มีฟิลด์สำหรับจับคู่คอลัมน์
NightPOS heuristically tries to find the type of field for each column inside the imported file, based on the first ten lines of the files.
ตัวอย่างเช่น หากมีคอลัมน์ที่มีเฉพาะตัวเลข จะแสดงเฉพาะฟิลด์ที่มีประเภท integer เป็นตัวเลือก
แม้ว่าพฤติกรรมนี้อาจเป็นประโยชน์ในกรณีส่วนใหญ่ แต่ก็เป็นไปได้ว่าอาจล้มเหลว หรือคอลัมน์อาจถูกจับคู่กับฟิลด์ที่ไม่ได้นำเสนอตามค่าเริ่มต้น
หากเกิดเหตุการณ์นี้ขึ้น ให้เลือกตัวเลือก Show fields of relation fields (advanced) จากนั้นรายการฟิลด์ที่สมบูรณ์จะพร้อมใช้งานสำหรับแต่ละคอลัมน์
เปลี่ยนรูปแบบการนำเข้าข้อมูล
Note
NightPOS can automatically detect if a column is a date, and tries to guess the date format from a
set of most commonly used date formats. While this process can work for many date formats, some
date formats are not recognizable. This can cause confusion, due to day-month inversions; it is
difficult to guess which part of a date format is the day, and which part is the month, in a
date, such as 01-03-2016.
When importing a CSV file, NightPOS provides Formatting options.
To view which date format NightPOS has found from the file, check the Date Format that is shown when clicking on options under the file selector. If this format is incorrect, change it to the preferred format using ISO 8601 to define the format.
Important
ISO 8601 เป็นมาตรฐานระหว่างประเทศที่ครอบคลุมการแลกเปลี่ยนทั่วโลกพร้อมกับการสื่อสารข้อมูลที่เกี่ยวข้องกับวันที่และเวลา ตัวอย่างเช่น รูปแบบวันที่ควรเป็น YYYY-MM-DD ในกรณีของวันที่ 24 กรกฎาคม 1981 ควรเขียนเป็น 1981-07-24
Tip
When importing Excel files (.xls, .xlsx), consider using date cells to store dates. This
maintains locale date formats for display, regardless of how the date is formatted in NightPOS. When
importing a CSV file, use NightPOS's Formatting section
to select the date format columns to import.
นำเข้าตัวเลขที่มีสัญลักษณ์สกุลเงิน
NightPOS fully supports numbers with parenthesis to represent negative signs, as well as numbers with currency signs attached to them. NightPOS also automatically detects which thousand/decimal separator is used. If a currency symbol unknown to NightPOS is used, it might not be recognized as a number, and the import crashes.
Note
เมื่อนำเข้าไฟล์ CSV เมนู Formatting จะปรากฏในคอลัมน์ด้านซ้าย ภายใต้ตัวเลือกเหล่านี้ สามารถเปลี่ยน Thousands Separator ได้
ตัวอย่างตัวเลขที่รองรับ (ใช้ 'สามหมื่นสองพัน' เป็นตัวเลข):
32.000,00
32000,00
32,000.00
-32000.00
(32000.00)
$ 32.000,00
(32000.00 €)
ตัวอย่างที่ไม่ทำงาน:
ABC 32.000,00
$ (32.000,00)
Important
A () (parenthesis) around the number indicates that the number is a negative value. The currency symbol must be placed within the parenthesis for NightPOS to recognize it as a negative currency value.
ตารางแสดงตัวอย่างการนำเข้าไม่แสดงอย่างถูกต้อง
ค่าเริ่มต้นของการแสดงตัวอย่างการนำเข้าตั้งเป็นเครื่องหมายจุลภาคเป็นตัวคั่นฟิลด์ และเครื่องหมายคำพูดเป็นตัวคั่นข้อความ หากไฟล์ CSV ไม่มีการตั้งค่าเหล่านี้ ให้แก้ไขตัวเลือก Formatting (แสดงใต้แถบไฟล์ Import CSV หลังจากเลือกไฟล์ CSV)
Important
If the CSV file has a tabulation as a separator, NightPOS does not detect the separations. The file format options need to be modified in the spreadsheet application. See the following Change CSV file format section.
เปลี่ยนรูปแบบไฟล์ CSV ในแอปพลิเคชันสเปรดชีต
When editing and saving CSV files in spreadsheet applications, the computer's regional settings are applied for the separator and delimiter. NightPOS suggests using OpenOffice or LibreOffice, as both applications allow modifications of all three options (from LibreOffice application, go to ).
Microsoft Excel สามารถแก้ไขการเข้ารหัสเมื่อบันทึก ()
ความแตกต่างระหว่าง Database ID และ External ID
Some fields define a relationship with another object. For example, the country of a contact is a link to a record of the 'Country' object. When such fields are imported, NightPOS has to recreate links between the different records. To help import such fields, NightPOS provides three mechanisms.
Important
ควรใช้กลไก**เพียงหนึ่ง**กลไกต่อฟิลด์ที่นำเข้า
For example, to reference the country of a contact, NightPOS proposes three different fields to import:
Country: ชื่อหรือรหัสของประเทศ
Country/Database ID: the unique NightPOS ID for a record, defined by the ID PostgreSQL column
Country/External ID: ID ของเรกคอร์ดนี้ที่อ้างอิงในแอปพลิเคชันอื่น (หรือไฟล์
.XMLที่นำเข้า)
สำหรับประเทศเบลเยียม ตัวอย่างเช่น ใช้วิธีใดวิธีหนึ่งจากสามวิธีนี้ในการนำเข้า:
Country:
BelgiumCountry/Database ID:
21Country/External ID:
base.be
ตามความต้องการของบริษัท ให้ใช้วิธีใดวิธีหนึ่งจากสามวิธีนี้เพื่ออ้างอิงเรกคอร์ดในความสัมพันธ์ ต่อไปนี้เป็นตัวอย่างว่าควรใช้วิธีใดตามความต้องการ:
ใช้ Country: นี่เป็นวิธีที่ง่ายที่สุดเมื่อข้อมูลมาจากไฟล์ CSV ที่สร้างด้วยตนเอง
ใช้ Country/Database ID: ควรใช้ไม่บ่อยนัก ส่วนใหญ่ใช้โดยนักพัฒนา เนื่องจากข้อได้เปรียบหลักคือไม่มีความขัดแย้ง (อาจมีหลายเรกคอร์ดที่มีชื่อเดียวกัน แต่จะมี Database ID ที่ไม่ซ้ำกันเสมอ)
ใช้ Country/External ID: ใช้ External ID เมื่อนำเข้าข้อมูลจากแอปพลิเคชันของบุคคลที่สาม
เมื่อใช้ ID ภายนอก ให้โหลดไฟล์ CSV ที่มีคอลัมน์ External ID (ID) ที่กำหนด ID ภายนอก ของแต่ละระเบียนที่นำเข้า จากนั้นจึงสามารถสร้างการอ้างอิงไปยังบันทึกนั้นได้โดยใช้คอลัมน์ เช่น Field/External ID ไฟล์ CSV สองไฟล์ต่อไปนี้เป็นตัวอย่างของผลิตภัณฑ์และหมวดหมู่ของผลิตภัณฑ์
นำเข้าฟิลด์ความสัมพันธ์
An NightPOS object is always related to many other objects (e.g. a product is linked to product categories, attributes, vendors, etc.). To import those relations, the records of the related object need to be imported first, from their own list menu.
สามารถทำได้โดยใช้ชื่อของบันทึกที่เกี่ยวข้องหรือ ID ของบันทึกนั้น ขึ้นอยู่กับสถานการณ์ ID จะถูกคาดหวังเมื่อบันทึกสองรายการมีชื่อเดียวกัน ในกรณีดังกล่าว ให้เพิ่ม / ID ที่ส่วนท้ายของชื่อคอลัมน์ (เช่น สำหรับคุณลักษณะของผลิตภัณฑ์: คุณลักษณะของผลิตภัณฑ์ / คุณลักษณะ / ID)
ตัวเลือกสำหรับการจับคู่หลายรายการในฟิลด์
If, for example, there are two product categories with the child name Sellable (e.g. Misc.
Products/Sellable & Other Products/Sellable), the validation is halted, but the data may still be
imported. However, NightPOS recommends that the data is not imported because it will all be linked to
the first Sellable category found in the Product Category list (Misc. Products/Sellable).
NightPOS, instead, recommends modifying one of the duplicate's values, or the product category
hierarchy.
However, if the company does not wish to change the configuration of product categories, NightPOS recommends making use of the External ID for this field, 'Category'.
นำเข้าฟิลด์ความสัมพันธ์ many2many
แท็กควรคั่นด้วยเครื่องหมายจุลภาค โดยไม่มีช่องว่าง ตัวอย่างเช่น หากลูกค้าต้องการเชื่อมโยงกับทั้งสองแท็ก: Manufacturer และ Retailer จะต้องเข้ารหัส 'Manufacturer,Retailer' ในคอลัมน์เดียวกันของไฟล์ CSV
นำเข้าความสัมพันธ์ one2many
หากบริษัทต้องการนำเข้าใบสั่งขายที่มีบรรทัดคำสั่งซื้อหลายรายการ แถวเฉพาะจะ ต้อง ถูกจองไว้ในไฟล์ CSV สำหรับแต่ละบรรทัดคำสั่งซื้อ รายการคำสั่งซื้อแรกจะถูกนำเข้าในแถวเดียวกันกับข้อมูลที่สัมพันธ์กับคำสั่งซื้อ บรรทัดเพิ่มเติมจำเป็นต้องมีแถวเพิ่มเติมที่ไม่มีข้อมูลใดๆ ในฟิลด์ที่เกี่ยวข้องกับคำสั่งซื้อ
Example
บริษัทนำเข้าใบเสนอราคาโดยใช้ไฟล์ CSV ตามข้อมูลสาธิต:
บริษัทนำเข้าใบสั่งซื้อพร้อมรายการใบสั่งซื้อที่เกี่ยวข้องโดยใช้ไฟล์ CSV:
บริษัทนำเข้าลูกค้าและรายชื่อผู้ติดต่อที่เกี่ยวข้องโดยใช้ไฟล์ CSV:
นำเข้าไฟล์ภาพ
เพื่อนำเข้าไฟล์ภาพพร้อมกับไฟล์ CSV หรือ Excel ที่:ref:อัปโหลด <essentials/export_import_data/get-started> ให้ทำตามขั้นตอนต่อไปนี้:
เพิ่มชื่อไฟล์ภาพลงในคอลัมน์ Image ที่เกี่ยวข้องในไฟล์ข้อมูล
อัปโหลดไฟล์ข้อมูล หรือโหลดซ้ำโดยคลิก Load Data File
คลิก Upload your files ภายใต้ส่วน Files to import
เลือกไฟล์ภาพที่เกี่ยวข้อง จำนวนไฟล์ที่เลือกจะปรากฏถัดจากปุ่ม
คลิก Test เพื่อตรวจสอบว่าข้อมูลทั้งหมดถูกต้อง
Click Import. During the import process, NightPOS performs a file check to automatically link the uploaded images to the imported data file. If there is no match, the data file is imported without any image.
Note
ส่วน Files to import จะเปิดใช้งานได้หากเทมเพลตสินค้ามีคอลัมน์ Image ที่มีข้อมูลครบทุกฟิลด์
ชื่อไฟล์ภาพในไฟล์ข้อมูลต้องตรงกับไฟล์ภาพที่อัปโหลด
When importing a large number of images, specify the maximum batch size in megabytes and set a delay to prevent the system from becoming overloaded. To do so, enable the developer mode and fill in the Max size per batch and the Delay after each batch fields in the Files to import section. By default, the delay meets the RPC/API call limit defined in the NightPOS Cloud - Acceptable Use Policy.
นำเข้าระเบียนหลายครั้ง
หากไฟล์ที่นำเข้ามีคอลัมน์ใดคอลัมน์หนึ่งต่อไปนี้: รหัสภายนอก หรือ รหัสฐานข้อมูล บันทึกที่นำเข้าไปแล้วจะถูกแก้ไขแทนที่จะถูกสร้างใหม่ ซึ่งมีประโยชน์อย่างยิ่งเนื่องจากช่วยให้ผู้ใช้สามารถนำเข้าไฟล์ CSV เดียวกันได้หลายครั้งในขณะที่มีการเปลี่ยนแปลงบางอย่างระหว่างการนำเข้าสองครั้ง
NightPOS takes care of creating or modifying each record, depending if it is new or not.
This feature allows a company to use the Import/Export tool in NightPOS to modify a batch of records in a spreadsheet application.
ไม่ได้ระบุค่าสำหรับฟิลด์เฉพาะ
If all fields are not set in the CSV file, NightPOS assigns the default value for every non-defined field. However, if fields are set with empty values in the CSV file, NightPOS sets the empty value in the field, instead of assigning the default value.
Export/import different tables from an SQL application to NightPOS
หากต้องการนำเข้าข้อมูลจากตารางต่างๆ จะต้องสร้างความสัมพันธ์ระหว่างระเบียนที่อยู่ในตารางต่างๆ ขึ้นมาใหม่ ตัวอย่างเช่น หากมีการนำเข้าบริษัทและบุคคล จะต้องสร้างลิงก์ระหว่างแต่ละบุคคลกับบริษัทที่พวกเขาทำงานให้ขึ้นมาใหม่
To manage relations between tables, use the External ID facilities of NightPOS. The External ID of a
record is the unique identifier of this record in another application. The External ID must be
unique across all records of all objects. It is a good practice to prefix this External ID with
the name of the application or table. (like, 'company_1', 'person_1' - instead of '1')
Jako příklad předpokládejme, že existuje SQL databáze se dvěma tabulkami, které mají být importovány: společnosti a lidé. Každá osoba patří k jedné společnosti, takže je třeba znovu vytvořit spojení mezi osobou a společností, pro kterou pracuje.
Vyzkoušejte tento příklad s ukázkou PostgreSQL databáze.
Nejprve exportujte všechny společnosti a jejich Externí ID. V PSQL napište následující příkaz:
> copy (select 'company_'||id as "External ID",company_name as "Name",'True' as "Is a Company" from companies) TO '/tmp/company.csv' with CSV HEADER;
Tento SQL příkaz vytvoří následující CSV soubor:
External ID,Name,Is a Company
company_1,Bigees,True
company_2,Organi,True
company_3,Boum,True
Pro vytvoření CSV souboru pro osoby propojené se společnostmi použijte následující SQL příkaz v PSQL:
> copy (select 'person_'||id as "External ID",person_name as "Name",'False' as "Is a Company",'company_'||company_id as "Related Company/External ID" from persons) TO '/tmp/person.csv' with CSV
Vytvoří následující CSV soubor:
External ID,Name,Is a Company,Related Company/External ID
person_1,Fabien,False,company_1
person_2,Laurence,False,company_1
person_3,Eric,False,company_2
person_4,Ramsy,False,company_3
ในไฟล์นี้ Fabien และ Laurence กำลังทำงานให้กับบริษัท Bigees (company_1) และ Eric กำลังทำงานให้กับบริษัท Organi ความสัมพันธ์ระหว่างบุคคลและบริษัทเสร็จสิ้นโดยใช้ ID ภายนอก ของบริษัท รหัสภายนอก นำหน้าด้วยชื่อของตารางเพื่อหลีกเลี่ยงความขัดแย้งของรหัสระหว่างบุคคลและบริษัท (person_1 และ company_1 ซึ่งใช้ ID 1 เดียวกันในฐานข้อมูลดั้งเดิม)
The two files produced are ready to be imported in NightPOS without any modifications. After having imported these two CSV files, there are four contacts and three companies (the first two contacts are linked to the first company). Keep in mind to first import the companies, and then the people.
Update data in NightPOS
Existující data lze hromadně aktualizovat prostřednictvím importu dat, pokud Externí ID zůstane konzistentní.
Příprava exportu dat
เพื่ออัปเดตข้อมูลผ่านการนำเข้า ให้ไปที่ข้อมูลที่ต้องการอัปเดต และเลือกไอคอน (List) เพื่อเปิดใช้งานมุมมองรายการ ที่ด้านซ้ายสุดของรายการ ให้ทำเครื่องหมายในช่องทำเครื่องหมายสำหรับระเบียนใดๆ ที่ต้องการอัปเดต จากนั้นคลิกปุ่ม Actions และเลือก Export จากเมนูแบบเลื่อนลง
Ve výsledném vyskakovacím okně Export dat zaškrtněte políčko Chci aktualizovat data (export kompatibilní s importem). Tím se automaticky zahrne Externí ID do exportu. Navíc se omezí seznam Pole k exportu pouze na pole, která lze importovat.
Note
Pole Externí ID se nezobrazí v seznamu Pole k exportu, pokud není ručně přidáno, ale stále je zahrnuto v exportu. Pokud je však zaškrtnuto políčko Chci aktualizovat data (export kompatibilní s importem), je zahrnuto v exportu.
Vyberte požadovaná pole, která mají být zahrnuta do exportu, pomocí možností ve vyskakovacím okně a poté klikněte na Exportovat.
Import aktualizovaných dat
Po exportu proveďte v datovém souboru potřebné změny. Když je soubor připraven, lze jej importovat podle stejného postupu jako při běžném importu dat.
Danger
Při aktualizaci dat je nesmírně důležité, aby Externí ID zůstalo konzistentní, protože takto systém identifikuje záznam. Pokud je ID změněno nebo odstraněno, systém může přidat duplicitní záznam místo aktualizace stávajícího.