ปลั๊กอิน Gmail
The Gmail Plugin integrates an NightPOS database with a Gmail inbox, so users can keep track of all their work between Gmail and NightPOS, without losing any information.
Important
ตรวจสอบให้แน่ใจว่าได้ตรวจสอบเวอร์ชั่นของฐานข้อมูลใน ที่ด้านล่างของหน้า
For database versions 19.2 and later, see the latest documentation for installation instructions.
ดูเพิ่มเติม
Learn how NightPOS handles your data by reading NightPOS's Privacy Policy and Terms and Conditions.
NightPOS Online users
For databases hosted on NightPOS Online (or NightPOS.sh), follow the steps below to configure the Gmail Plugin.
ติดตั้งปลั๊กอิน Gmail
First, log in to the Gmail account that the user wishes to connect to NightPOS.
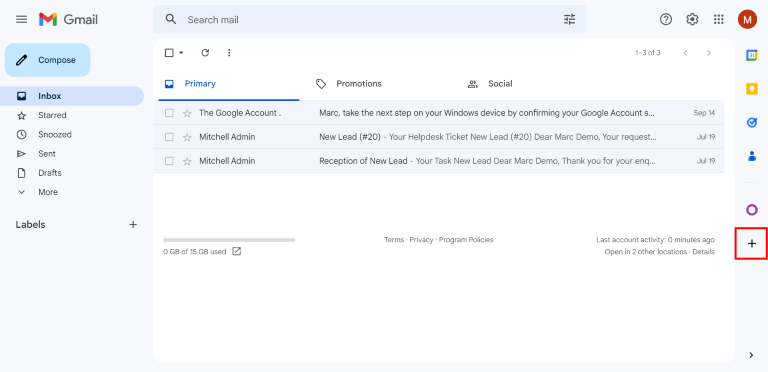
จากกล่องจดหมาย Gmail ให้คลิกไอคอนเครื่องหมายบวกที่แผงด้านขวาเพื่อรับส่วนเสริม หากแผงด้านข้างไม่ปรากฏ ให้คลิกไอคอนลูกศรที่มุมขวาล่างของกล่องจดหมายเพื่อแสดงส่วนเสริมนั้น
Then, use the search bar to search for NightPOS and locate the NightPOS Inbox Addin.

Or, go directly to the NightPOS Inbox Addin page on the Google Workspace Marketplace.
เมื่อค้นหาปลั๊กอินได้แล้ว ให้คลิก ติดตั้ง จากนั้นคลิก ดำเนินการต่อ เพื่อเริ่มการติดตั้ง
Next, select which Gmail account the user wishes to connect to NightPOS. Then click Allow to let NightPOS access the Google account. Google will then show a pop-up window confirming that the installation was successful.
Configure the NightPOS database
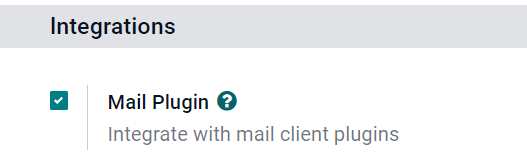
The Mail Plugin feature must be enabled in the NightPOS database in order to use the Gmail Plugin. To enable the feature, go to . Under the Integrations section, activate Mail Plugin, and then click Save.
กำหนดค่ากล่องจดหมาย Gmail
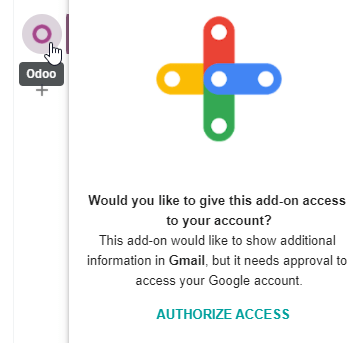
In the Gmail inbox, a purple NightPOS icon is now visible on the right side panel. Click on the NightPOS icon to open up the NightPOS plugin window. Then, click on any email in the inbox. Click Authorize Access in the plugin window to grant NightPOS access to the Gmail inbox.
Next, click Login. Then, enter the URL of the NightPOS database that the user wishes to connect to the Gmail inbox, and log in to the database.
Note
Use the general URL for the database, not the URL of a specific page in the database. For
example, use https://mycompany.nightpos.com, not
https://mycompany.nightpos.com/web#cids=1&action=menu.
Finally, click Allow to let Gmail access the NightPOS database. The browser will then show a Success! message. After that, close the window. The Gmail inbox and NightPOS database are now connected.
NightPOS On-Premise users
For databases hosted on servers other than NightPOS Online (or NightPOS.sh), follow the steps below to configure the Gmail Plugin.
Note
Google กำหนดให้ผู้สร้างส่วนเสริมต้องจัดทำรายการ URL ที่สามารถใช้ในการดำเนินการและการเปลี่ยนเส้นทางที่เปิดใช้งานโดยส่วนเสริม ซึ่งถือเป็นแนวทางปฏิบัติด้านความปลอดภัย การทำเช่นนี้จะช่วยปกป้องผู้ใช้โดยรับประกันว่าส่วนเสริมจะไม่เปลี่ยนเส้นทางผู้ใช้ไปยังเว็บไซต์ที่เป็นอันตราย (อ่านเพิ่มเติมเกี่ยวกับ Google Apps Script.)
Since NightPOS can only list the nightpos.com domain and not every on-premise customer's unique server
domain, on-premise customers cannot install the Gmail Plugin from the Google Workspace
Marketplace.
ติดตั้งปลั๊กอิน Gmail
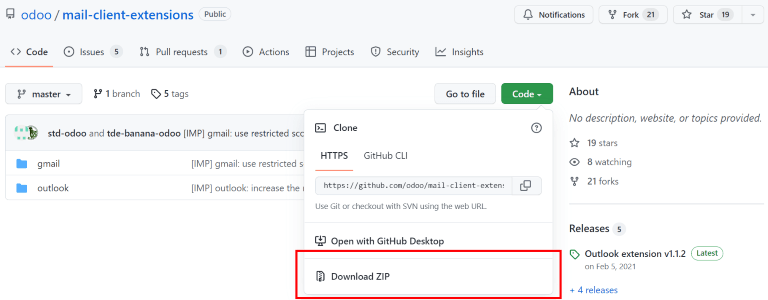
First, access the GitHub repository for the NightPOS Mail Plugins. Next, click on the green Code button. Then, click Download ZIP to download the Mail Plugin files onto the user's computer.
เปิดไฟล์ ZIP บนคอมพิวเตอร์ จากนั้นไปที่ และเปิดไฟล์ login.ts โดยใช้ซอฟต์แวร์แก้ไขข้อความ เช่น Notepad (Windows), TextEdit (Mac) หรือ Visual Studio Code
ลบข้อความสามบรรทัดต่อไปนี้ออกจากไฟล์ login.ts:
if (!/^https:\/\/([^\/?]*\.)?nightpos\.com(\/|$)/.test(validatedUrl)) {
     return notify("The URL must be a subdomain of nightpos.com");
}
This removes the nightpos.com domain constraint from the Gmail Plugin program.
Next, in the ZIP file, go to , and open the
file called appsscript.json. In the urlFetchWhitelist section, replace all
the references to nightpos.com with the NightPOS customer's unique server domain.
จากนั้น ในโฟลเดอร์เดียวกัน gmail ให้เปิดไฟล์ชื่อ README.md ทำตามคำแนะนำในไฟล์ README.md เพื่อพุชไฟล์ปลั๊กอิน Gmail เป็น Google Project
Note
คอมพิวเตอร์จะต้องสามารถรันคำสั่ง Linux ได้ จึงจะปฏิบัติตามคำแนะนำในไฟล์ README.md ได้
After that, share the Google Project with the Gmail account that the user wishes to connect to NightPOS. Then, click Publish and Deploy from manifest. Lastly, click Install the add-on to install the Gmail Plugin.
Configure the NightPOS database
The Mail Plugin feature must be enabled in the NightPOS database in order to use the Gmail Plugin. To enable the feature, go to . Under the Integrations section, activate Mail Plugin, and then click Save.
กำหนดค่ากล่องจดหมาย Gmail
In the Gmail inbox, a purple NightPOS icon is now visible on the right side panel. Click on the NightPOS icon to open up the NightPOS plugin window. Then, click on any email in the inbox. Click Authorize Access in the plugin window to grant NightPOS access to the Gmail inbox.
Next, click Login. Then, enter the URL of the NightPOS database that the user wishes to connect to the Gmail inbox, and log in to the database.
Note
Use the general URL for the database, not the URL of a specific page in the database. For
example, use https://mycompany.nightpos.com, not
https://mycompany.nightpos.com/web#cids=1&action=menu.
Finally, click Allow to let Gmail access the NightPOS database. The browser will then show a Success! message. After that, close the window. The Gmail inbox and NightPOS database are now connected.